- Modules
- Basic Effects with Harmony Premium
- About Input and Output Ports
About Input and Output Ports
T-HFND-010-005
Each node has an input port at the top and an output port at the bottom. Some are blue and others are light-green or bright green.
Blue indicates drawing information.

Light green indicates position and movement (transformation).

Bright green shows the element on top of the composition and outputs that element’s Z position to the Composite node. When many elements have different Z positions (multiplane, different distances from the camera) and are placed through a Composite node that flattens them together (producing one image with one Z value), the system needs to give a Z position to this new image. It uses the bright green port information.

Finally, some nodes contain more than one input port. These are usually effect nodes needing different drawing or position information in order to perform their calculation. When the two ports are blue, the Drawing is on the right and the Matte is on the left. If it's light-green, the drawing needs extra position information.
A matte, also called mask, is the shape that will be used by the effect node to modify the original image (left input port). The effect will only be applied where the matte overlaps the original image. Sometimes the matte will act as a negative shape that the effect will exclude. This all depends on the nature and editing properties of the effect.
Some effects contain three input ports. If they are green, then they require a transformation (Peg, Quadmap, Quake, etc.) connection (coordinate and value information).

Both the Write and Display nodes do not have output ports. This is because the information that flows into them can go no further in the node system. The Write node records the images and renders the final output. The Display node captures the visual information and outputs it to the Camera, Perspective, Top, Side and Timeline views.

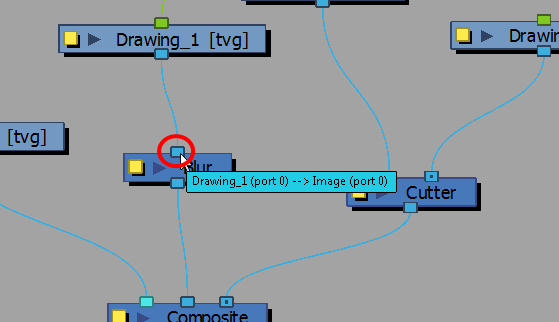
If you are unsure of the type of connection required for a node, you can click on the port itself and the port type will be displayed.

On each port is a tooltip which displays the source of input ports and the destination(s) of the output ports (node names).

Time Estimated 10 mins
Difficulty Level Beginner
Topics List
- About Effects
- Node View
- Node Library View
- Adding Effects
- About Input and Output Ports
- Connecting Effects
- Blur
- Transparency
- Cutter
- Using the Cutter Node
- Glow Node
- Highlight Node
- About Effects Preview
- Previewing Effects in Render Mode
- Playing Back Effects
- Exporting a QuickTime Movie
- Activity 1: Staging a Night Scene
- Activity 2: Adding Blurs and Transparencies
- Activity 3: Masking a Light Source