- Modules
- Importing Content with Harmony Premium
- Importing PSD Files as Separate Layers
Importing PSD Files as Separate Layers
T-HFND-007-003
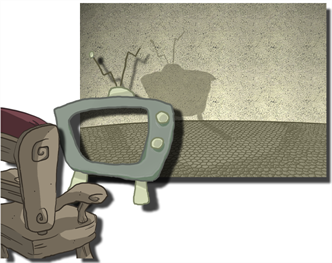
PSD files (a format exportable exclusively from Adobe Photoshop) are unique in that they are able to retain multiple layers. This is advantageous as the image remains fully editable in terms of any colour correction, effects, masking, transparency, or compositing that were made to the .psd file in Adobe Photoshop. Harmony supports 8 and 16 bit files.

How to import a multi-layer PSD file
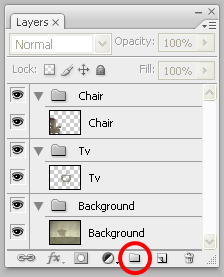
- In Adobe Photoshop, organize your file so that all your layers are “grouped” into individual folders, or that all the elements you want to import as a single layer in Harmony are grouped together in their own folder. Any layer that is not in a folder group, by itself or otherwise, will not be imported.

- In Harmony, go to the top menu and select File > Import > Images or click the Import Images
 button.
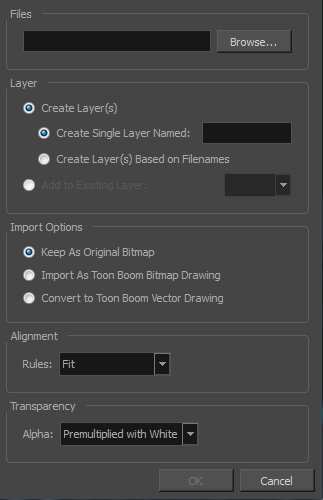
The Import Images dialog box opens.

- In the Files section, click Browse to find and select the .psd image on your computer.
- In the Layer section, select the Create Layer(s) option, then select one of the following options:
- Create Single Layer Named: Creates a new layer with the specified name and imports the images into it.
- Create Layer(s) Based on Filenames: Creates a layer based on each unique filename prefix. For example, if you import three files named a-1.tga, a-2.tga and b-1.tga, this will create two layers, one named "a" and one named "b". Layer "a" will contain the two first images and "b" will contain the third one.
- Add to Existing Layer: Imports the images into the specified layer. Note that you can only import into layers that are compatible with your import options. For example, if you're importing images as vector drawings, you can only import them into vector drawing layers.
- Select the Create Symbol for Imported Items option if you want the layers to be contained in symbols.
- In the Import Options section, select the following option to import your image as its original format.
- Keep As Original Bitmap: Retains an imported image as a bitmap. In the Alignment section, decide on the size and placement of your image within the camera frame. Depending on the Scene Settings (the height and width in pixels that you chose for your project), an image that you import may get scaled to the point where all its individual pixels become visible.
- Decide whether to select Vectorize Imported Items option.
- Click OK.
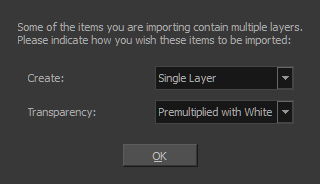
The Multilayer Image Import Settings dialog box opens.

- From the Create menu, select one of the following:
- Single Layer: To import the Camera and Layout layers merged together.
- Separated Layers: To keep your Camera and Layout layers separated.
- From the Transparency menu, select one of Alpha option.
- Click OK.
Your image appears as separate layers in the Timeline view, corresponding to the PSD layer group folders.
NOTE: The artwork displayed in every one of your layers as a result of a multilayer PSD file import is linked to the same source image. This means that if you use the Drawing > Delete Selected Drawings command to physically delete the drawing from the project folder, the exposed drawing will be deleted in all layers at once. Once deleted from the project folder, the image cannot be retrieved unless you reimport your psd file.
Time Estimated 10 mins
Difficulty Level Beginner
Topics List
- About Bitmap Image Import
- Importing Bitmap Images
- Importing PSD Files as Separate Layers
- Changing the Bitmap Image Quality
- About Vector Image Import
- Importing AI and PDF Files
- Setting the Scene Length
- Extending a Single Exposure
- Importing a Sound File
- Playing Sound
- Activity 1: Importing a Background and Sound File