- Modules
- Importing Content with Harmony Premium
- Changing the Bitmap Image Quality
Changing the Bitmap Image Quality
T-HFND-007-004
If the bitmap images that you imported look blurry or slightly pixelated, you can increase the image proxy display by changing the quality of the preview in the Camera view. It will not affect the final render.
How to change the bitmap image quality
- In the Camera view, double-click on the bitmap image to enter its symbol if the image is encapsulated or simply select the bitmap image layer in the Timeline view if it's not.
- Do one of the following:
- From the top menu, select View > Bitmap File Quality.
- From the Camera menu, select View > Bitmap File Quality.
- Press Ctrl + Q (Windows/Linux) or ⌘ + Q (macOS).
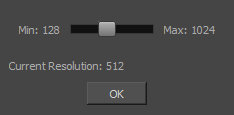
The Bitmap Image Quality dialog box opens.

- Drag the slider to the right to improve the quality.
- Click OK.
- If you are inside a symbol, go to the top of the Camera view and click Top to exit the symbol and return to your scene.
Time Estimated 5 mins
Difficulty Level Beginner
Topics List
- About Bitmap Image Import
- Importing Bitmap Images
- Importing PSD Files as Separate Layers
- Changing the Bitmap Image Quality
- About Vector Image Import
- Importing AI and PDF Files
- Setting the Scene Length
- Extending a Single Exposure
- Importing a Sound File
- Playing Sound
- Activity 1: Importing a Background and Sound File