- Modules
- Take Animation
- Activity 3: Animating a Take
Activity 3: Animating a Take
Warning: DOMDocument::loadHTML(): Unexpected end tag : img in Entity, line: 6 in /var/www/html/app/models/TopicTranslation.php on line 28
Warning: DOMDocument::loadHTML(): Unexpected end tag : img in Entity, line: 30 in /var/www/html/app/models/TopicTranslation.php on line 28
Warning: DOMDocument::loadHTML(): Unexpected end tag : img in Entity, line: 33 in /var/www/html/app/models/TopicTranslation.php on line 28
Warning: DOMDocument::loadHTML(): Unexpected end tag : img in Entity, line: 36 in /var/www/html/app/models/TopicTranslation.php on line 28
Warning: DOMDocument::loadHTML(): Unexpected end tag : img in Entity, line: 39 in /var/www/html/app/models/TopicTranslation.php on line 28
Warning: DOMDocument::loadHTML(): Unexpected end tag : img in Entity, line: 48 in /var/www/html/app/models/TopicTranslation.php on line 28
Warning: DOMDocument::loadHTML(): Unexpected end tag : img in Entity, line: 54 in /var/www/html/app/models/TopicTranslation.php on line 28
Warning: DOMDocument::loadHTML(): Unexpected end tag : img in Entity, line: 57 in /var/www/html/app/models/TopicTranslation.php on line 28
Warning: DOMDocument::loadHTML(): Unexpected end tag : img in Entity, line: 61 in /var/www/html/app/models/TopicTranslation.php on line 28
Warning: DOMDocument::loadHTML(): Unexpected end tag : img in Entity, line: 64 in /var/www/html/app/models/TopicTranslation.php on line 28
Warning: DOMDocument::loadHTML(): Unexpected end tag : img in Entity, line: 73 in /var/www/html/app/models/TopicTranslation.php on line 28
Warning: DOMDocument::loadHTML(): Unexpected end tag : img in Entity, line: 73 in /var/www/html/app/models/TopicTranslation.php on line 28
Warning: DOMDocument::loadHTML(): Unexpected end tag : img in Entity, line: 74 in /var/www/html/app/models/TopicTranslation.php on line 28
Warning: DOMDocument::loadHTML(): Unexpected end tag : img in Entity, line: 77 in /var/www/html/app/models/TopicTranslation.php on line 28
Warning: DOMDocument::loadHTML(): Unexpected end tag : img in Entity, line: 83 in /var/www/html/app/models/TopicTranslation.php on line 28
Warning: DOMDocument::loadHTML(): Unexpected end tag : img in Entity, line: 84 in /var/www/html/app/models/TopicTranslation.php on line 28
Warning: DOMDocument::loadHTML(): Unexpected end tag : img in Entity, line: 84 in /var/www/html/app/models/TopicTranslation.php on line 28
Warning: DOMDocument::loadHTML(): Unexpected end tag : img in Entity, line: 87 in /var/www/html/app/models/TopicTranslation.php on line 28
T-EXC-004-005
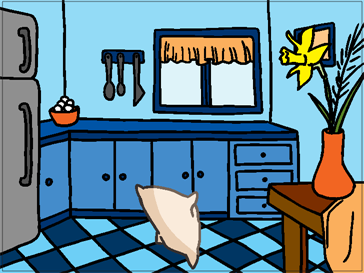
In this activity, we will move the acting of the take to a new level. You will use the Flour Bag character again for this exercise. To goal is to animate a small scene where the Flour Bag sees something, does a take, then reacts to what is happening. You can keep it very simple. The goal is have the flour bag look alive!
You will first need to storyboard your idea. A storyboard is a visual plan of all the scenes and shots in an animation. The storyboard indicates what will happen, when it will happen and how the objects in the scene are laid out. Using a sketch pad or index cards, take the time to sketch out in detail the actions that the Flour Bag will do and to plan the timing of your animation. Make sure that your scene does not run beyond 10 seconds in length.

Material
You can download the provided sample material for this module and use the following templates to use as a reference to compare with your final sketch. Don't forget to unzip (uncompress) the files before placing them in your library.
- MO-EXC-004/01-background-sketch.tpl
- MO-EXC-004/02-overlay-rough.tpl
- MO-EXC-004/03-background-cleanup.tpl
- MO-EXC-004/04-overlay-cleanup.tpl
- MO-EXC-004/05-flour-sack-rough.tpl
- MO-EXC-004/06-flour-sack-cleanup.tpl
- MO-EXC-004/07-egg-rough.tpl
- MO-EXC-004/08-egg-cleanup.tpl
- MO-EXC-004/09-egg02-cleanup.tpl
How to animate the flour bag
- Once everything is planned, you are ready to start your scene. Start Harmony.
- In the Welcome Screen, name your project: Flour_Bag.
- Start your work by creating all the drawing levels that you will need for your scene. You should have a least a level for the background, the flour bag and a foreground. If you have another character or an accessory, you should create a new drawing level for these too. To do so, go to the Timeline view, click the Add Element
 button and select Drawing. Create drawing layers that will be for the clean-up. Create as many as you need. You should also take the time to rename them.
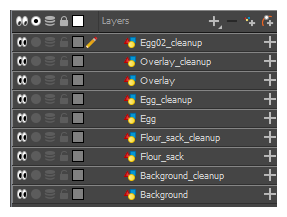
- With the Brush
 tool, draw the background and foreground first. This is where your animation takes place. You will need to know where your character will move before you can actually animate it. In our example, the action will take place in the kitchen.
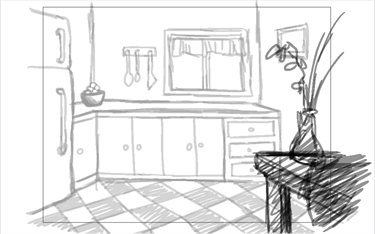
NOTE: If you have issues with the previous steps, import the 01-background-sketch.tpl and 02-overlay-rough.tpl templates.
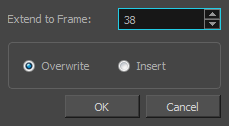
- Extend the background and foreground frames for all 10 seconds of your animation. To do this, right-click the frame and select Extend Exposure.
- Now that your scene is set up, you can animate the flour bag. Start with the key poses and then verify that the timing of your animation is correct. Keep it rough. Your goal is to learn acting.

- Click the Show Onion Skin
 button to see the previous and next frames of your animation, so you can draw the in-betweens.
In the Timeline, you can move the blue handles on each side to include the frames you need in the onion skinning option.

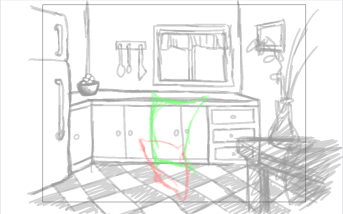
NOTE: If you have issues with the previous steps, import the 05-flour-sack-rough.tpl and 07-egg-rough.tpl templates.
- If you have a second character or another object that moves in your scene, now is the time to animate it. Again, keep it rough and alive. Do not try to clean up everything that you draw at this stage.
- On your layers reserved for cleanup, start cleaning up your animation drawings using the Brush
 or Pencil
  tool.
tool. - Use the Paint
 tool to colour your frames.
NOTE: If you have issues with the previous steps, import the 03-background-cleanup.tpl, 04-overlay-cleanup.tpl, 06-flour-sack-cleanup.tpl, 08-egg-cleanup.tpl, and 09-egg02-cleanup.tpl templates.
- Save
 your project.
 - Play back
 your animation and test/correct your work. You can also activate the Loop
  button to view your animation in loops while noting the corrections you have to do.
Time Estimated 40 mins
Difficulty Level Beginner