- Modules
- Introduction to Animation with Harmony Essentials
- Timeline View
Timeline View
To set your animation timing, you will mostly work with the Timeline and Xsheet views. It's extremely useful to become familiar with the Timeline view, how it works, and its interface.
The Timeline view is the main view used when adjusting the timing of drawings, adding keyframes and ordering layers. The Timeline view displays layers, effects, sounds, keyframe values, scene length, layer names, drawings, keyframes, timing, and frames.
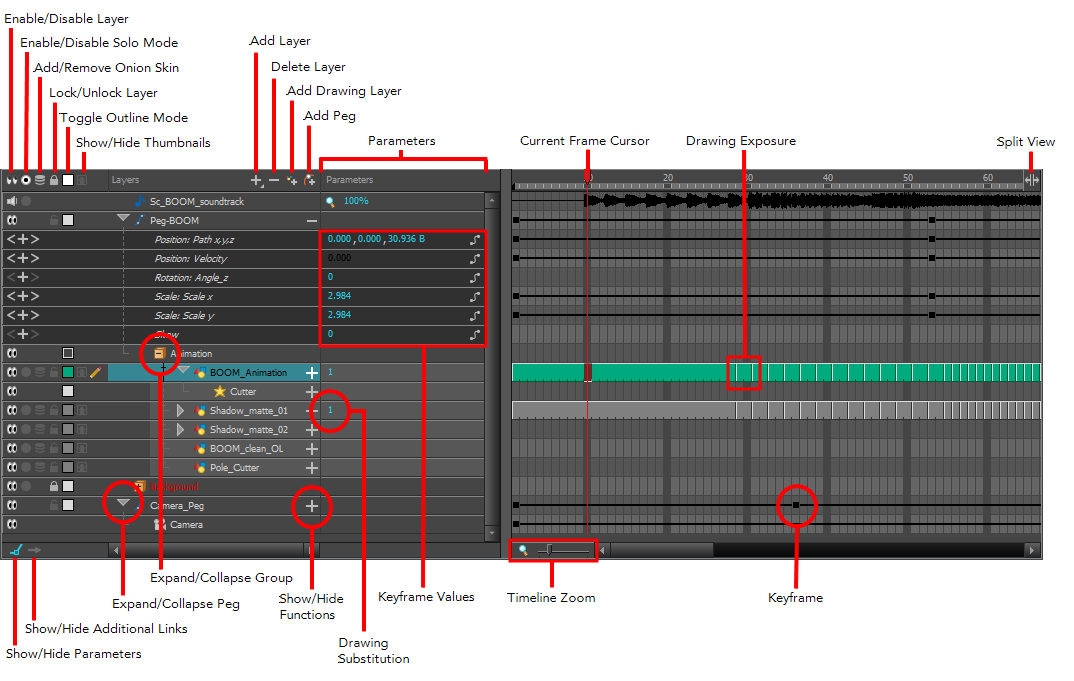
The Timeline view allows you to read your timing from left to right. It represents the scene’s elements in their simplest form. You can also see the layers and their names, as well as the drawing’s exposure. The drawing name is displayed when you place your pointer over the drawing’s exposure.

How to access the Timeline view
Do one of the following:
- From the top menu, select Windows > Timeline.
- From any of the other views, click the Add View
 button and select Timeline.
| Icon | Section | Description |
|
|
Enable/Disable Layer |
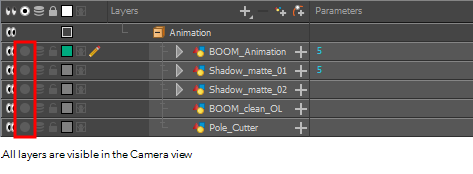
The Enable/Disable All button lets you enable or disable layers. Disabling a layer makes the scene behave as if it didn't exist, including when rendering the scene. For example:
To disable a layer, click the layer's Enable/Disable button or press D.
To enable a layer, click the layer's Enable/Disable button or press A.
NOTE: Next to sound layers, the Enable/Disable layer button will look like this:
TIP: You can enable or disable all layers by clicking on the Enable or disable all layers
|
|
|
Enable/Disable Solo Mode |
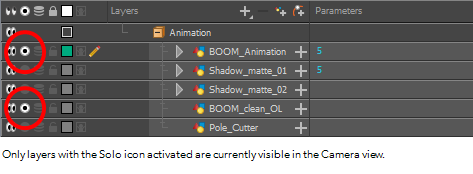
Solo mode allows you to only view specific layers in the Camera view and hide all others. When solo mode is enabled on one layer, only this layer will be visible. If solo mode is enabled on several layers, and only these layers will be visible. If solo mode is not enabled on any layer, all enabled layers will be visible. You can also use solo mode on sound tracks. If solo mode is enabled on any sound tracks, only those sound tracks will play during playback.
TIP: When some layers are in solo mode, you can disable or re-enable solo mode on all layers that have it enabled by clicking on the Toggle solo mode on or off
|
|
|
Add to/Remove from Onion Skin |
For when the Onion Skin option is enabled, this allows you to enable or disable Onion Skin on specific layers.
TIP: To activate the general Onion Skin preview, in the Tools toolbar, click the Onion Skin button
|
|
|
Lock/Unlock Layer | The Lock/Unlock Layer button lets you prevent the selection or editing of a layer in the Camera view. To select some of the layers without selecting others, in the Timeline view, lock the layers you do not want to select. When a layer is locked, its name is displayed in red.
In the top menu, there is a series of locking options. Select Animation > Lock > select one of the following:
NOTE: For more information, see About Selection Locking. |

|
Toggle Outline Mode / Change Track Colour |
Each drawing layer has a little colour swatch that has two functionalities:
|
|
|
Show/Hide Thumbnails |
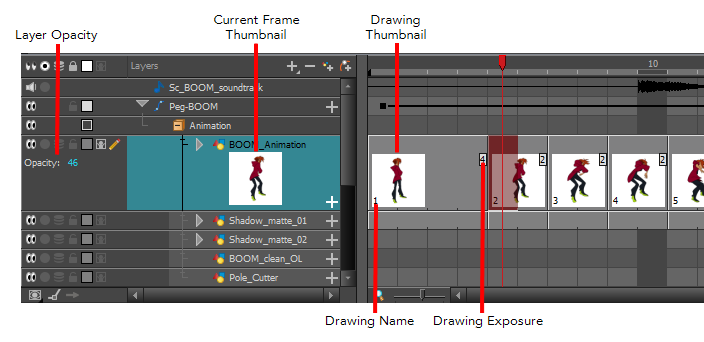
Expands the layer to display a thumbnail of the drawing in the current frame, as well as for each drawing in the timeline. NOTE: By default, the timeline's zoom level does not allow enough horizontal space to fully display the thumbnails of drawings exposed for one or two frames only. To see the thumbnails for drawings with short exposure, you must increase the timeline's zoom level—see Timeline Zoom.
When a drawing layer is in Show Thumbnails mode:
TIP: You can show or hide thumbnails for all drawing layers by clicking on the Show/Hide All Thumbnails
|
| Opacity |
Allows you to set the opacity level of the layer. Click and drag the value left or right to decrease or increase the layer's opacity. NOTE: This parameter only displays for drawing layers that are in Show Thumbnails mode.
|
|
|
|
Active Drawing Layer Indicator |
This icon appears next to the active drawing layer, which is the layer you draw on when using drawing tools. NOTE: The active drawing layer is not always the selected layer. For example, if you select a drawing layer, then a peg layer, the peg layer will be the selected layer, but the active drawing layer will remain the last drawing layer you selected, until you select another drawing layer.
|
|
|
Add Layer |
The Add Layers button lets you add new layers to the Timeline view. When you click the Add Layers button, a menu appears displaying |
|
|
Delete |
The Delete Layers button lets you delete the currently selected layers in the Timeline view |
|
|
Add Drawing Layer |
The Add Drawing Layer button lets you automatically add a new drawing layer to the Timeline view. By default, the layer is named |
|
|
Add Peg |
The Add Peg button lets you add a peg layer to the timeline. If several layers are selected, a peg is added and parented to each layer
|
|
|
Expand/Collapse |
The Expand/Collapse button is used to display the children layers of a parent layer. Once a layer is parented to another layer, it is indented to the right and the Collapse/Expand Children button appears on the parent layer allowing you to show or hide the child layer.
|
|
|
The Show/Hide Functions button lets you display the functions embedded in each layer. The functions are the different coordinates and values used to record a layer’s parameters at each frame. This information is stored on the function curves using keyframes. If the layer can be connected to another layer, for example to use a drawing layer as a matte, expanding a layer's functions will also list its possible connections. You can connect layers by dragging and dropping a layer onto another layer's connection.
|
|
|
|
Add/Remove Keyframe |
Adds a keyframe at the current frame of the selected function or removes the keyframe at the current frame of the selected function, if there is one already. NOTE: This button only displays for function layers.
|
|
|
Previous Keyframe |
Moves the timeline cursor to the previous keyframe on the selected function. NOTE: This button only displays for function layers.
|
|
|
Next Keyframe |
Moves the timeline cursor to the next keyframe on the selected function. NOTE: This button only displays for function layers.
|
|
|
Function Menu |
Displays the Function menu, which allows you to create a new function for the function layer, or to link it to an existing shared function. NOTE: This button only displays for functions layers, in the Parameters column—see Show/Hide Parameters.
|

|
Function Keyframe |
A frame where the value for one or more of the layer's functions is preset. The position of each layers in key poses for digital animation is recorded in function keyframes. You can grab and move function keyframes as well as copy, cut, paste and delete them. TIP: If you have a keyframe and a drawing selected simultaneously, and you wish to delete the keyframe without deleting the drawing's exposure by doing one of the following:
NOTE: If a collapsed layer has children that have function keyframes, you will see a white square
 instead. instead. |
|
|
Split |
The Split button lets you split the Timeline view in two sections, allowing you to see two different portions of the Timeline view. This can be useful if you need to often switch between two specific points of a lengthy scene.
|

|
Drawing Exposure |
In the Timeline view, when a drawing is exposed, it is represented by a grey block that extends from the first frame it is exposed to the last frame it is exposed.
|
|
|
Show/Hide Parameters |
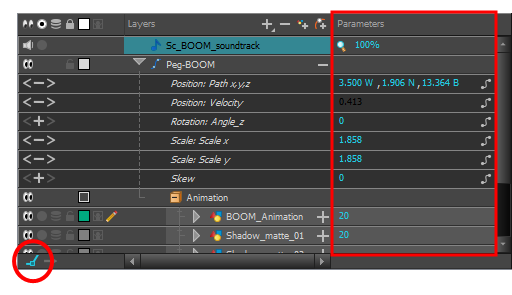
Shows or hides the Parameters column, right of the Layers column. The Parameters column displays information on the layer at the current frame, depending on the type of layer it is:
Using the mouse, you can drag the parameter left and right to change its value. This is especially useful for quickly changing a drawing's exposure at the current frame. |
|
|
Show/Hide Additional Links |
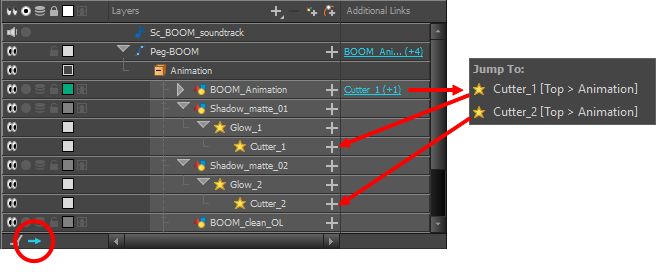
Shows or hides the Additional Links column. The Additional Links column displays layers that are connected under the layer, but for other purposes than being the parent of those layers. For example, if a layer is used as the matte of an effect, the effect will be displayed in that layer's Additional Links. If more than one layers are in a layer's Additional Links, only the first of these layers will be displayed, followed by the amount of extra linked layers there are. By clicking on the Additional Links, you can open a menu listing the linked layers, and click on one of these layers to navigate to it. In the following example, the BOOM_Animation layer is used as the matte of Cutter_1 and Cutter_2:
|
|
|
Reduces or increases the width of frames in the Timeline view. Move the slider right to increase the width or left to reduce it. You can also press 2 to zoom in and 1 to zoom out when the Timeline view is focused on. If you want to reset the Timeline view's zoom, click on the Timeline Zoon |
Time Estimated 10 mins
Difficulty Level Beginner
Topics List
- About Paperless Animation
- Timeline View
- Xsheet View
- Extending the Exposure of Previous Drawings
- Using the Onion Skin
- Typing Exposure
- Creating Cycles
- Setting the Exposure
- Cleaning Animation
- Using the Light Table
- Activity 1: Rough Animation
- About Duplicate Layers
- Duplicating Layers
- About Colour Palettes
- About Colour Swatches
- Adding a Colour Swatch
- Adding a Gradient Colour Swatch
- Adding a Texture Colour Swatch
- Painting Multiple Drawings
- Activity 2: Changing the Colour of the Animation
- Activity 3: Adding a Colour Card and Exporting


