- Modules
- Project Management
- Merging and Replacing Scenes
Merging and Replacing Scenes
T-SBADV-002-006
If you have extracted smaller projects out of your current project so that different project collaborators could work on parts of your storyboard simultaneously, you can replaced the scenes in your project with the updated scenes in their projects using the Merge and Replace dialog.
NOTE: When merging projects, the video and sound clips in the master project will remain synchronized with the cue time of their respective panels. Clips that extend beyond the boundaries of a panel will be synchronize with the panel in which they are cued, not the panel in which they end.
Material
To complete this topic, you will need the following from the sample material you downloaded:
- MO-SBADV-002T-SBADV-002-006_MergeReplace
- Author
- Kim Bussiahn
- Trainer and Content Creator
- toonboom.com
How to replace scenes in your project with the updated scenes in projects that were extracted from it
- Open your master project.
- Select File > Project Management > Merge and Replace.
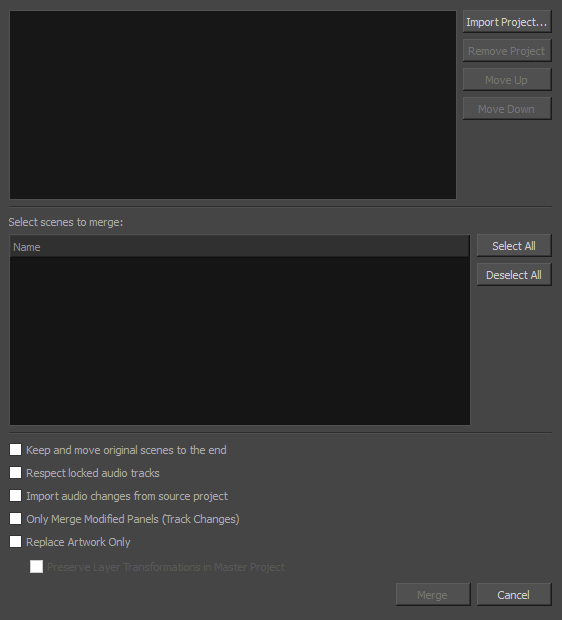
The Advanced Merge Storyboard dialog box opens.

- For each project that you want to merge into the current project:
- Click Import Project
- Browse to and locate the .sboard or .sbpz file of the project you want to merge into the current project.
- For each project that you added to the list of imported projects, do one of the following:
- If you want to merge every scene from the project you are importing, check the checkbox left of the project in the project list at the top. This will select every scene in that project for import.
- If you want to merge only some scenes from the project into the current project, select that project in the list of projects at the top. Then, in the list of scenes at the bottom, check every scene that you want to merge.
- If you need to reorder one of the projects you imported, select it, then click on Move Up or Move Down to change its order in the list.
NOTE: You can also select the scene, then click on the Select All button right of the scenes list.NOTE: If the project contains sequences, the list of scenes will contain sequences, and scenes will be listed under their respective sequence. You can check the checkbox next to a sequence to select every scene in that sequence.NOTE: If you are merging projects that were originally extracted from the current project, their order in the list does not matter as these projects' scenes will replace the original scenes in the current project.
- If you want to preserve a copy of the original scenes along with their updated version, check the Keep and move original scenes to the end option. A backup of each scene that gets replaced will be added at the end of the storyboard.
- If you want audio tracks that you previously locked to remain exactly as they are, check the Respect locked audio tracks option. Otherwise, clips in locked audio tracks will be moved to remain synchronized with the panels in which they are cued.
- If you want changes made to the audio in the projects getting merged to be imported into the current project, check the Import audio changes from source project option.
- If you only want to import panels that have been marked as tracked for changes in the imported projects, check the Only Merge Modified Panels (Track Changes) option.
- If you don't want the adjustments to the length of panels and scenes made in the imported projects to be merged into the current project, check the Replace Artwork Only option.
- If you don't want the adjustments to the layer transformations and animations in the imported projects to be merged into the current project, check the Preserver Layer Transformations in Master Project option.
- Click on Merge.
Time Estimated 5 mins
Difficulty Level Intermediate
Topics List
- Project Management
- Splitting Storyboards
- Extracting Storyboards Projects
- Merging Storyboard Projects
- Inserting Scenes
- Merging and Replacing Scenes