- Modules
- Project Management
- Merging Storyboard Projects
Merging Storyboard Projects
T-SBADV-002-004
Using the Merge Storyboard dialog, you can merge several small projects and make a big project. This is useful if you have split or extracted your project into several projects in the past, and now you want to assemble those small projects back together.
Material
To complete this topic, you will need the following from the sample material you downloaded:
- MO-SBADV-002/T-SBADV-002-004_Insert
- Author
- Kim Bussiahn
- Trainer and Content Creator
- toonboom.com
How to merge different projects into a single project
- Select File > Project Management > Merge.
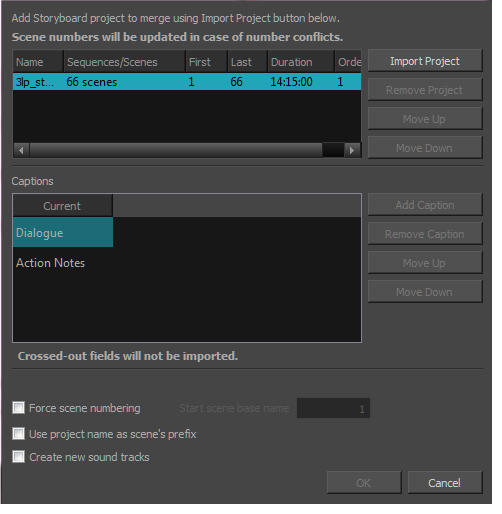
The Merge Storyboard window opens.

- For each project that you want to insert to your current project:
- Click on Import Project.
- In the file browser dialog that appears, browse for and select the project file that you want to add to the current project, then click on Open.
- If you want to change the order of the project relative to the other projects being assembled together, select it and click on Move Up or Move Down. In the end, the scenes of each project being merged together will be assembled in the order in which they appear in the list.
The project is added to the list of projects at the top.
NOTE: You can move projects above the current project. Their scenes will be inserted before the scenes in the current project. - In the Captions list, you can see your current project's caption fields alongside the caption fields of each project that you are merging. Do the following to ensure each project's caption fields are properly merged:
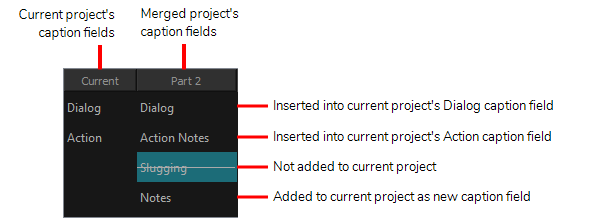
- If the caption fields of any project being imported are not horizontally aligned with their corresponding caption field for the current project, select these fields and use the Move Up and Move Down button until they are aligned.
- If there are new caption fields in the projects being imported that you want to add to the current project, move them down to the bottom of the list, below the current project's caption fields. This will make it so these captions get added as new fields instead of their content getting inserted in existing fields.
- If you want any caption field of one of the projects being imported to be left out, so that they are not added to the current project, move them down to the bottom of the list, below the current project's caption fields, then click on Remove Caption.
Refer to the following example:

- By default, the scene numbers in the projects being merged will be have a suffix letter added to them if any other scene in the current project or in other projects being merged have the same scene number. If would prefer that all scenes in the project are numbered in series regardless of what their previous scene number was:
- Enable the Force scenes numbering option. This will make it so every scene in the project will be numbered in a series after all the projects have been merged together.
- In the Start scene base name field, type in the number that you want the first scene in the resulting project to have.
- If you are not re-numbering the scenes, you can add the name of each project getting merged into the current project to the name of their scenes, so that you can easily identify which scene came from which project. To do this, check the Use project name as scene's prefix option.
- If you want to have the audio tracks from each merged project to be imported into separate audio tracks in the resulting project, check the Create new audio tracks option . Otherwise, the audio clips from the merged projects will be inserted in the existing audio tracks of the current project, when possible, and new audio tracks will only be created if needed.
- Click on OK.
Time Estimated 5 mins
Difficulty Level Intermediate
Topics List
- Project Management
- Splitting Storyboards
- Extracting Storyboards Projects
- Merging Storyboard Projects
- Inserting Scenes
- Merging and Replacing Scenes