- Modules
- Project Management
- Splitting Storyboards
Splitting Storyboards
T-SBADV-002-002
Using the Split Storyboard dialog, you can divide your storyboard into two separate projects so that two project collaborators can work on their half of the project simultaneously. Later, you can assemble both halves of the project back into a single project.
Material
To complete this topic, you will need the following from the sample material you downloaded:
- MO-SBADV-002/SBP_Rocket_Rodeo_V13
- Author
- Kim Bussiahn
- Trainer and Content Creator
- toonboom.com
There are two approaches to splitting your project:
- You can choose to export one half of the project into a different project and keep the other half in the current project. If you do this, you can assemble the project back into a single project by inserting the second half at the end of the first half, or by merging both projects together.
- You can choose to split the current project into two new projects and keep the current project as a master project. Later, you can assemble the split projects back into the master project using the Merge and Replace dialog.
How to split a storyboard project into two projects
- In the Timeline, move the timeline playhead to the panel where you want the split to take place.
- Select File > Project Management > Split.

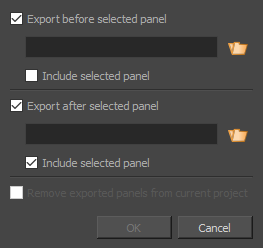
The Split Storyboard window opens.
- Do one of the following to decide how your project is separated:
- If you want the current project to keep the first half of the storyboard and to extract the second half into a new project, make sure that Export before selected panel is unchecked and that Export after selected panel is checked.
- If you want the current project to keep the second half of the storyboard and to extract the first half into a new project, make sure that Export before selected panel is checked and that Export after selected panel is unchecked.
- If you want to keep the current project as the master project and to export both halves of the storyboard into new project, check both Export before selected panel and Export after selected panel.
- For each half of the project that you chose to extract into a new project:
- Click on the Browse
button for this half of the project.
- In the Save dialog that appears, browse to the location where you want to save this half of the project.
- Type in a name for this half of the project and click on Save.
- Click on the Browse
- Do one of the following to decide in which half of the project the current panel will go:
- If you want the current panel to be in the first half of the project:
- If you chose to only export after the selected panel, leave both Include selected panel options unchecked.
- If you chose to export before the selected panel, check the Include selected panel option under Export before selected panel.
- If you want the current panel to be in the second half of the project:
- If you chose to only export before the selected panel, leave both Include selected panel options unchecked.
- If you chose to export after the selected panel, check the Include selected panel option under Export after selected panel.
- If you want the current panel to be in the first half of the project:
- If you chose to only extract one half of the project into a new project, and only want to keep the remaining half in the current project, check the Remove exported panels from current project option. If you prefer to keep a copy of the scenes being extracted in the current project, make sure this option is unchecked.
- Click on OK.
Project folders containing the split projects will be created in their selected destinations, with their chosen project names.
Time Estimated 5 mins
Difficulty Level Intermediate