- Modules
- Animatic Cameras
- Timing Keyframes
Timing Keyframes
T-SBANIM-004-008
If you need to change the frame or timing of a keyframe in the Timeline view, there are a few different ways to do this. Note that camera keyframes can only be moved to a new location within the same scene.
The following two methods are useful when you want to move a keyframe to a new location, or cut and paste a keyframe.
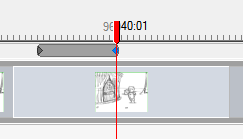
How to drag camera keyframes to a new location in the Timeline view
- In the Timeline view, select one or more keyframes.
The keyframe turns blue.
- Drag the selected keyframe left or right to choose a new position in time. You can only drag it to a new location within the current scene.

While you drag the keyframe, its position relative to the scene is displayed in a black box. The number of frames is also displayed from the original position the new keyframe will be located.

How to using the Cut and Paste commands to move keyframes
- In the Timeline view, select one or more keyframes.
The keyframe turns blue.

- Select Edit > Cut Camera Keyframes or press Ctrl + X (Windows) or ⌘ + X (macOS).
The keyframe is removed and copied to the Clipboard.

- Within the same scene, move the red playhead to the position on which you want to paste the keyframe.
- Select Edit > Paste Camera Keyframes or press Ctrl + V (Windows) or ⌘ + V (macOS)).

Time Estimated 5 mins
Difficulty Level Intermediate
Topics List
- About the Stage and Camera Views
- Positioning the Camera
- Resetting the Camera
- Syncing Keyframes
- Snapping Keyframes to Sound Clips
- Timing Keyframes
- Activity 1: Animating the Camera using Sync and Snapping Keyframes
- Animating the 3D Camera
- Aligning 2D Layers with the Camera
- About 3D Camera Moves
- Activity 2: Creating a 3D Camera Move