- Modules
- Project Export
- Exporting a QuickTime Movie
Exporting a QuickTime Movie
T-SBFND-010-004
You can export your project into one or several movie files.
On Windows, you can export in Windows Media Video (.wmv) by default, and you can also export in QuickTime Movie (.mov) format if you have Apple QuickTime installed. On macOS, you can only export in QuickTime Movie (.mov) format. In either case, exporting in QuickTime Movie (.mov) format gives you access to a wider selection of video codecs and compression settings.
How to export a movie
- In the top menu, select File > Export > Movie.
The Export to Movie dialog box opens.
- In the Destination Path section, click the Browse
 button and choose a folder in which to save the exported files.
- In the File Pattern field, type in a prefix
or a file naming pattern for the exported files—see About File Naming Patterns .
- In the Export Movie Format panel, configure the following options:
- In the Movie Format drop-down, select an export format:
- QuickTime Movie (*.mov) to export a video in QuickTime Movie (.mov) format.
- Windows Media Video (*.wmv) to export a video in Windows Media Video (.wmv) format. This option is only available on Windows.
- Click on Movie Options if you want to customize the video and audio encoding settings for your movie file. If you are exporting in QuickTime Movie (.mov) format, see Configuring Movie Settings for QuickTime Movies. If you are exporting in Windows Media Video (.wmv) format, see Configuring Movie Settings for Windows Media Video.
- In the Resolution dropdown, select whether you want the exported movie to be in Full Size, Half Size or Quarter Size, relative to the resolution of your project. It is recommended to export your animatic in full size unless you want to quickly export a test video.
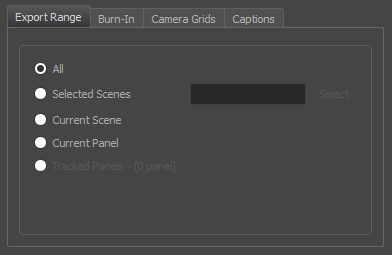
- In the Export Range section, select whether you want to export the entire project, or only specific parts of it:

- All: Exports the entire storyboard.
- Selected Scenes: Select this option to export a specific selection of scenes. Then, click on the Select button to open the Scenes Picker dialog box, in which you can:
- Type the number of a sequence or of a scene in the Sequence or Scene fields in the Filter section, to only show matching sequences or matching scenes in the list.
- Click and drag to select a range of scenes.
- Hold the Ctrl key and click on each scene you want to add to your selection.
- Hold the Shift key, then click on the first scene and the last scene you want to add to your selection, to select every scene between those two scenes inclusively.
- If your project has sequences, click on a sequence to select every scene in that sequence.
- Current Scene: Exports only the currently selected scene.
- Current Panel: Exports only the currently selected panel.
- Tracked Panels:Exports panels on which tracking changes is enabled
—see About Track Changes .
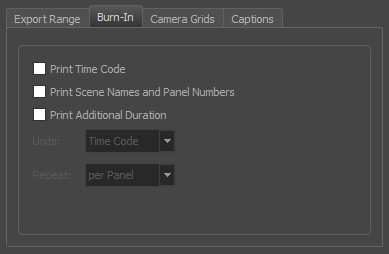
- In the Burn-In tab, choose what kind of information you want to have printed into the exported files:

- Print Time Code: Prints the global timecode on each rendered image.
- Print Scene Names and Panel Numbers: Prints the scene names and panel numbers as an overlay on your video.
- Print Additional Duration: Prints another time code counting the time for the current panel, scene or sequence, depending on what is selected in the Repeat drop-down.
- Units: Whether to print the additional duration in time units (seconds, minutes, etc.) or in frames.
- Repeat: Decide what to count the time of for the additional duration. For example, if set to per Panel, the time elapsed since the beginning of the current panel will be printed.
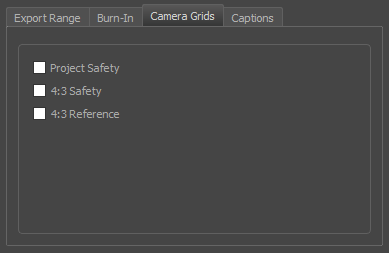
- In the Camera Grids tab, using these options, decides whether you want any kind of camera frame to be printed into the exported files:

- Project Safety: Prints the safe area on your video
. - 4:3 Safety: Prints the 4:3 safe area on each panel of your storyboard that has a camera movement.
- 4:3 Reference: Prints the 4:3 area on each panel of your storyboard that has a camera movement.
- In the Captions tab, you can choose to print any of your storyboard’s captions into the exported movies using the following options—see About Captions.

- Print Captions: Choose whether to not print captions (None) or select one of your project’s captions to print into the exported movies. By default, a Storyboard Pro project has Action Notes, Dialog, Slugging and Notes captions, but you can also choose to print custom captions if your project has any.
- Font: Select which font the captions will be printed in. By default, they will be printed in Arial.
- Height %: Sets the size of caption lines relative to the height of the exported movies. For example, if exporting a movie at 1080p with 3% Height captions, each caption line will be 32 pixels in height.
- Position: Prints the captions at either the Top Left, Top Centre, Top Right, Bottom Left, Bottom Centre or Bottom Right of the movie. By default, captions are printed to the Bottom Centre.
- Max Lines: Sets the maximum amount of caption lines to print on each panel. If a caption being printed requires more than the maximum amount of lines, it will be cut off with an ellipsis (...) at the end. Note that even if captions are printed at the bottom, they will be aligned to the top of the space reserved for them, which is calculated by the amount of Max Lines x the Height %. Therefore, if this setting is too high and captions are printed at the bottom, they may appear closer to the middle of the picture than to the bottom.
- Text Colour: Select the font colour in which to print the captions.
- Bg Colour: Select the background colour on which to print the captions. If the checkbox is unchecked, the captions will be printed directly into the rendered picture. Otherwise, they will be printed in rectangular boxes of the chosen colour.
- If you want to automatically play the video or view the exported files once the export is done, check the Open document/folder after export option.
- Click on the Export button.
Time Estimated 10 mins
Difficulty Level Beginner
Topics List
- Exporting to PDF
- Setting Up the PDF Export
- Adding Snapshot Markers
- Adding Security to a PDF
- Creating Custom PDF Layout Profiles
- Activity 1: Exporting a PDF
- Exporting a QuickTime Movie
- Activity 2: Exporting a QuickTime Movie
- Exporting Bitmap Images
- Activity: Exporting to Bitmap with Snapshots
- Exporting the Current Frame as a Bitmap Image