Creating a Feathered Effect with the Animated Matte Generator
T-COMP2-002-012
How to create a feathered effect with the Animated Matte Generator
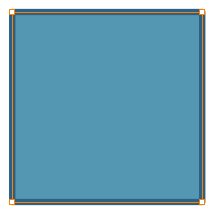
- Make sure the source drawing connected to the Animated Matte Generator closely matches the outer shape of the intended effect, but that it is simple, does not have too many vector points and is only painted in a single colour.
- In the Node or Timeline view, select the Animated Matte Generator node.
- In the Tool Properties view, set the Output Type to Feathered.
- Display the controls of the Animated Matte Generator node by doing one of the following:
- In the Camera view toolbar, click on Show Control
.
- From the top menu, select View > Show > Control.
- Press Shift + F11.
The control points for the Animated Matte Generator display in the Camera view.
- In the Camera view, click on Render View to see what the feathered effect will look like when rendered as you configure and animate it.
- In the Tools toolbar, select the Transform
tool.
- In the Animated Matte Generator view, do one of the following:
- If you want the Outer Contour to be based on the shape and dimensions of your matte drawing and the Inner Contour to be smaller, disable the Outer Contour
option and enable the Inner Contour
option.
- If you want the Inner Contour to be based on the shape and dimensions of your matte drawing and the Outer Contour to be bigger, enable the Outer Contour
option and disable the Inner Contour
option.
- In the Animated Matte Generator view, enable the Define Matte Point
option.
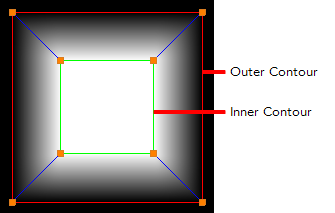
- In the Camera view, move the control points that you want to separate to their intended position. For example, if you are editing the outer contour, you would want its control points to wrap around the inner contour. If you are editing the inner contour, you would want its control points to be inside the outer contour.
- In the Layer Properties view, select the Advanced tab.
- In the Interpolation Mode drop-down, select one of the following options:
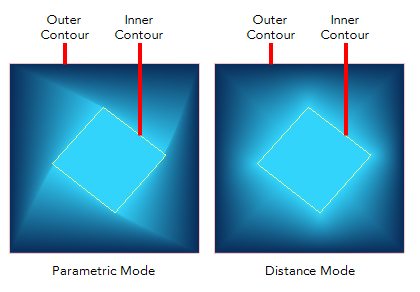
- Distance: Generates a linear gradient going from the inner contour to the outer contour.
- Parametric: Generates a linear gradient going from each side of the inner contour to the corresponding side of the outer contour. This mode is different from the Distance interpolation mode by how it makes the gradients track the matching sides of the inner and outer contours.
- Dot: Generates a gradient going from the inner contour to the outer contour, but based on a power function that creates the illusion of a thinner, harder outline.
- None: The outer and the inner contour are solid shapes, filled with their respective colours.
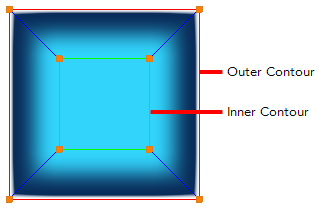
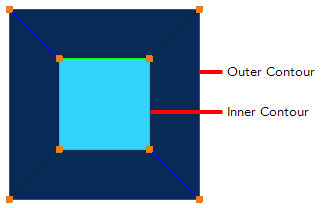
- In the Colour Interpolation dropdown, select one of the following options:
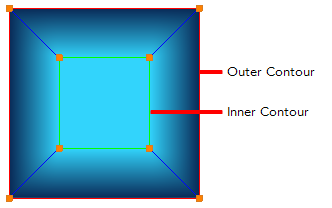
- Constant: Generates a gradient based on the inner colour, gradating in transparency only. The inner contour will have the opacity of the inner colour, and will gradate towards full transparency towards the outer contour.
- Linear 2 Colours: Creates a gradient that steadily gradates from the inner colour to the outer colour.
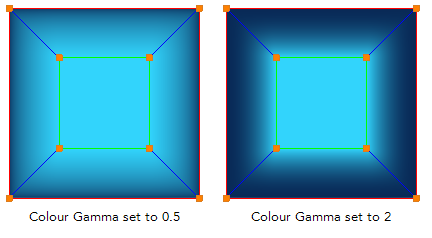
- Gamma 2 Colours: Creates a gradient that gradates from the inner colour to the outer colour on a Gamma curve, the power of which can be set in the Colour Gamma field. For more information, see the Colour Gamma field section below.
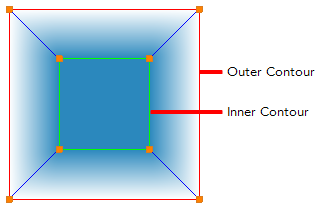
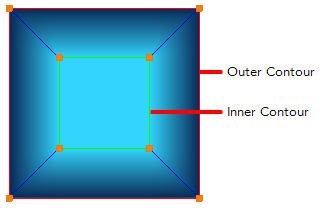
- If you set the Colour Interpolation parameter to Gamma 2 Colours, adjust the Colour Gamma parameter until you obtain the desired effect. When the Colour Gamma is set to any value between 0 and 1, the gradient will ease in from the inner colour to the outer colour. When it is set to any value above 1, the gradient will ease out from the inner colour to the outer colour.
- Set the Inner Colour to the colour that should fill the inner contour of the matte.
- Set the Outer Colour to the colour that the Inner Colour should gradate to in the outer contour.
- In the Alpha Interpolation dropdown, select one of the following options:
- Linear: Steadily gradates from the inner contour's alpha to the outer contour's aplha.
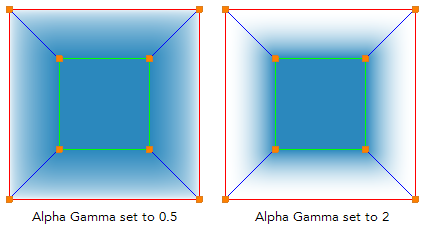
- Gamma: Calculates the alpha going from the inner contour to the outer contour based on a Gamma curve, the power of which can be set in the Alpha Gamma field. For more information, see the Alpha Gamma field section below.

- If you set the Alpha Interpolation parameter to Gamma, adjust the Alpha Gamma parameter until you obtain the desired effect. When the Alpha Gamma is set to any value between 0 and 1, the alpha values will ease in from the alpha value of the inner colour to the alpha value of the outer colour. When it is set to any value above 1, the alpha values will ease out from the alpha value of the inner colour to the alpha value of the outer colour.
Time Estimated 10 mins
Difficulty Level Intermediate
Topics List
- Understanding Mattes and the Cutter Node
- Cutter Node
- Nodes With a Visible Matte Port
- Using Integrated Matte Ports
- Camera View Modes
- Drawn Mattes
- Gradient Node Mattes
- Turbulence Mattes
- Colour Override and Colour Selector Mattes
- About the Animated Matte Generator
- Adding an Animated Matte Generator Node
- About Matte Creation and Animation with the Animated Matte Generator
- Displaying Animated Matte Generator Controls
- Adding Points to an Animated Matte Generator
- Animating the Contour of an Animated Matte Generator Contour
- About the Outer and Inner Contours of the Animated Matte Generator
- Separating the Outer and Inner Contours of an Animated Matte Generator
- Animating Interpolated Contours with the Animated Matte Generator
- Creating a Feathered Effect with the Animated Matte Generator
- Connecting a Snapping Source Drawing to an Animated Matte Generator
- Making Matte Contours Snap to a Drawing
- Using Animated Mattes