- Modules
- 3D Storyboard
- Replacing 3D Objects
Replacing 3D Objects
T-SBADV-011-005
Once you have imported a 3D model in the Library, you can easily replace it with a new one using the Replace 3D Model command. This will update all instances of the model used in the project.
How to replace a 3D model
- In the Library view, click the 3D Models folder to display its contents.
- From the 3D Models folder, select the model you want to replace.
- Right-click on the selected model and select Replace 3D Model.
A browser window opens.
- In the browser, locate the 3D model file you want to replace and click Open.
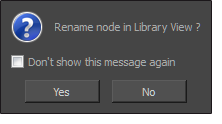
The Rename Node dialog box opens.

- Click Yes to rename the model you are replacing.
- Click No to keep the existing model name.
- Select the Don't show this message again option to prevent this dialog box from opening again, and use the same behavior as you choose now for future use of the Replace 3D Model command.
The 3D model is updated in the Library view and in your project.
Time Estimated 5 mins
Difficulty Level Intermediate
Topics List
- About 3D Objects
- Determining the Scale Factor
- About Pre-scaling 3D Objects
- Importing 3D Objects
- Replacing 3D Objects
- Adding 3D Objects
- Activity: Importing a 3D Model
- Displaying 3D Objects
- Positioning, Rotating and Scaling 3D Objects
- About 2D and 3D Object Interaction
- Creating 2D Layers on Surface of 3D Objects
- Activity: Positioning a 3D Object in a Panel and Draw on the Surface
- Maintaining the Size of Elements
- Positioning 3D Nodes
- Resetting a 3D Object's Position
- Snapping to Surface or Ground
- Activity: Separating 3D Subnodes on Different Layers