- Modules
- Traditional Animation Tools with Harmony Advanced and Premium
- Using the Onion Skin
Using the Onion Skin
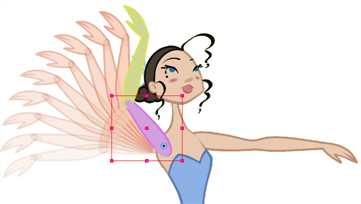
When animating cut-out characters, it is useful to see the previous and next frames on the animation. However, it can sometimes be confusing to see the onion skin for every part of the character. You will often only want to see the onion skin on a single part or a few parts, such as the arm that is currently being animated.

How to use the onion skin
- In the Tools toolbar, click the Onion Skin
 button or press Alt + O.
- In the Tools toolbar, click the Transform
 tool or press Shift + T.
- In the Camera view, select one or more elements.
- Select View > Onion Skin and one of the following commands:
- Add to Onion Skin: Adds a series of selected elements to the onion skin preview.
- Remove From Onion Skin: Removes a series of selected elements from the onion skin preview.
- Remove Unselected from Onion Skin: Removes all elements except the ones selected from the onion skin preview.
- Add All to Onion Skin: Adds all of the scene's elements to the onion skin preview.
- Remove All from Onion Skin: Removes all of the scene's elements from the onion skin preview.
Time Estimated 5 mins
Difficulty Level Beginner
Topics List
- About Paperless Animation
- Timeline View
- Xsheet View
- About Marking Drawings
- Marking Drawings
- Extending the Exposure of Previous Drawings
- Using the Onion Skin
- Typing Exposure
- Creating Cycles
- Setting the Exposure
- Cleaning Animation
- Using the Light Table
- Activity 1: Rough Animation
- About Duplicate Layers
- Duplicating Layers
- About Colour Palettes
- About Colour Swatches
- Adding a Colour Swatch
- Adding a Gradient Colour Swatch
- Adding a Texture Colour Swatch
- Painting Multiple Drawings
- Activity 2: Changing the Colour of the Animation
- Activity 3: Adding a Colour Card and Exporting