Cutter
T-HFND-010-009
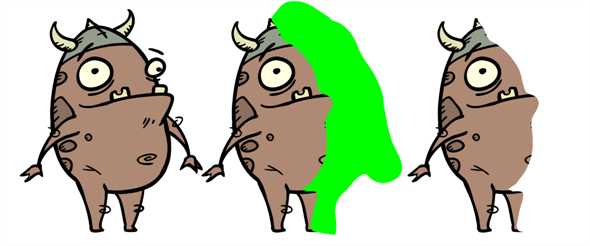
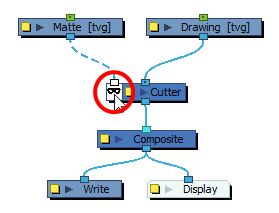
The Cutter effect cuts out a portion of an image. To do this, it needs to be connected to the drawing it is intended to cut as well as to a matte layer. The cutter will take the shape of the drawing in the matte layer and cut this shape out of the drawing layer. This is especially useful if you want to make a character disappear between a background element, or if you want to cut out a hole in the middle of a character.
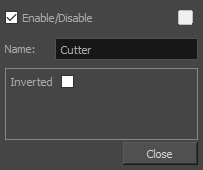
Like all effects that use a matte, the Cutter's effect has an Inverted parameter, which is disabled by default. When enabled, the Cutter will have the reverse effect: Instead of cutting the matte's shape out of the drawing, it will cut everything outside of the matte's shape out of the drawing, leaving only the parts of the drawing that are covered by the matte.
The Cutter effect can be used with 2D-3D integration. Rendered 2D drawings, integrated with 3D models, display soft, anti-aliased edges, even where the Cutter effect is applied.
Author
Christina Halstead
2D Animator and Character Designer
shadowbrushcreations.com
To learn more about using the Cutter node, see Using the Cutter Node .

Refer to the following example to connect this effect:

Properties

| Parameter | Description |
| Enable/Disable |
Enables or disables the selected node in the Camera, Timeline, and Node views. |
| Colour Swatch |
Changes the |
| Name |
Allows you to change the node's name. |
| Inverted |
When this option is enabled, the Cutter node will invert the matte shape to cut the drawing. Instead of cutting the image intersecting with the matte, it will cut any artwork outside of the matte shape. |
Time Estimated 10 mins
Difficulty Level Beginner
Topics List
- About Effects
- Node View
- Node Library View
- Adding Effects
- About Input and Output Ports
- Connecting Effects
- Blur
- Transparency
- Cutter
- Using the Cutter Node
- Glow Node
- Highlight Node
- About Effects Preview
- Previewing Effects in Render Mode
- Playing Back Effects
- Exporting a QuickTime Movie
- Activity 1: Staging a Night Scene
- Activity 2: Adding Blurs and Transparencies
- Activity 3: Masking a Light Source