- Modules
- Basic Effects with Harmony Premium
- Exporting a QuickTime Movie
Exporting a QuickTime Movie
T-HFND-010-013
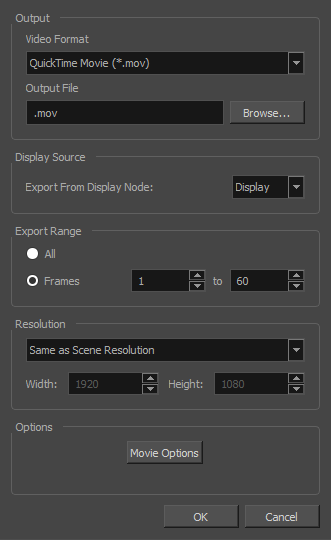
Using the Export Movie dialog, you can export your animation as a video file. By default, Harmony will export your entire scene in its full resolution. If you prefer, you can choose to export only a specific frame range in your scene, or to export in a smaller resolution, which can be useful if you need to save on time or disk space.
If you have specific requirements for the quality and size of your exported video files, you can use the Movie Options dialog to configure the video and audio compression settings. If you're exporting a QuickTime movie, you have access to all of the codecs and compression settings made available by QuickTime's interface.
How to export a movie file
- From the top menu, select File > Export > Movie.
The Export to QuickTime Movie dialog box opens.

- In the Video Format drop-down menu, select the desired format for your movie file:
- Quick Time Movie (*.mov): Available on Windows, macOS and Linux.
- Windows Media Video (*.wmv): Available on Windows only.
NOTE: On Windows and macOS, Apple QuickTime must be installed in order to export QuickTime movies. On Linux, Harmony uses a more limited, open source QuickTime-compatible library which does not require additional software.
- Click Browse to select the location and file name of your exported movie file.
- Click OK.
- In the Display Source section, select the Display node to use for rendering your project.
- From the Export Range section, decide whether you want to export the entire scene (All) or a specific frame range. If you decide on the latter, enter the frame range.

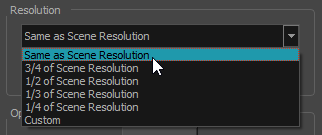
- In the Resolution section, select one of the following from the menu:
- A preferred resolution ratio.
- Custom: Enables the Width and Height fields so you can enter a specific size.


- Click OK.
- In the Export to QuickTime Movie dialog box, click OK.
A progress bar appears.

- Browse to the location on your computer where you exported your movie and double-click on it to view it in your video player.
Time Estimated 10 mins
Difficulty Level Beginner
Topics List
- About Effects
- Node View
- Node Library View
- Adding Effects
- About Input and Output Ports
- Connecting Effects
- Blur
- Transparency
- Cutter
- Using the Cutter Node
- Glow Node
- Highlight Node
- About Effects Preview
- Previewing Effects in Render Mode
- Playing Back Effects
- Exporting a QuickTime Movie
- Activity 1: Staging a Night Scene
- Activity 2: Adding Blurs and Transparencies
- Activity 3: Masking a Light Source