- Modules
- Basic Effects with Harmony Premium
- Highlight Node
Highlight Node
T-HFND-010-009C
The Highlight node lets you brighten an image's area to simulate a light source. For this effect, you will need to create a matte to determine the shape and position of the highlight on a separate element, so that you can blur the edges to create a softer effect. By adjusting the Highlight properties, you can control the type and amount of blur, as well as the colour of the Highlight effect.
Author
- Marc Fortin
- Senior Solutions Specialist
- toonboom.com
To learn more about using the Highlight node, see Using the Highlight Effect.

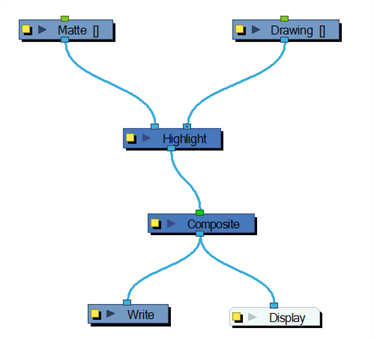
Refer to the following example to connect this effect:

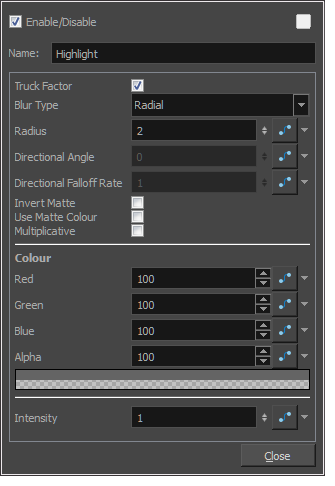
Properties

| Parameter | Description |
| Enable/Disable |
Enables or disables the selected node in the Camera, Timeline, and Node views. |
| Colour Swatch |
Changes the |
| Name | Use this field to rename the node. |
| Truck Factor | Activated by default, this option readjusts the blur when the elements undergo a change of depth or scale. When disabled, the effect's values will remain unchanged regardless of depth or scale changes. It is recommended that this option be disabled when multiple drawings are composited and attached this effect. |
| Blur Type |
Radial: The edges of the matte are blurred evenly around points that make up the edge of the matte. Directional: The matte is blurred in the direction you select. |
| Radius |
Enter a value for the size of the blur. The larger the value, the greater the blur effect. The blur radius is affected by the drawing scale and camera position. |
| Directional Angle |
If you selected the Directional Blur type, you can set the direction of the blur by entering a value from 0 to 360 in this field. 0: Blurs the image to the west. 90: Blurs the image to the south. 180: Blurs the image to the east. 270: Blurs the image to the north. |
| Directional Falloff Rate |
The distance where the blur fades from the edge of the image. Select a value between 0 and 1. 0: Makes the blur fade out slowly, distributing the blur evenly from the edge of the character to the farthest edge of the blur. 1: Makes the blur fade out quickly. The blur is heaviest closer to the edge of the image. |
| Invert Matte | Inverts the matte used to create the tone, shadow, or highlight. |
| Use Matte/Source Colour | Creates the shadow or tone using the matte shape's colour. Be sure that you are in render mode |
| Multiplicative | Multiplies the tone or shadow colours with the background. |
| Colour | |
| RGBA |
Enter a value to add or subtract from the colour channels in the drawings or attach these values to function curves. |
| Colour Swatch | Opens the Colour Picker where you can specify the colour. |
| Intensity |
Lets you set a value to determine the strength of the effect or attach a function to animate the effect. |
Next Topic
About Effects Preview
Time Estimated 10 mins
Difficulty Level Beginner
Topics List
- About Effects
- Node View
- Node Library View
- Adding Effects
- About Input and Output Ports
- Connecting Effects
- Blur
- Transparency
- Cutter
- Using the Cutter Node
- Glow Node
- Highlight Node
- About Effects Preview
- Previewing Effects in Render Mode
- Playing Back Effects
- Exporting a QuickTime Movie
- Activity 1: Staging a Night Scene
- Activity 2: Adding Blurs and Transparencies
- Activity 3: Masking a Light Source