About Camera Moves
T-SBFND-009-004
Camera keyframes enable you to modify the position of your camera and have it change over time. The camera keyframes are coordinates indicating the position of your camera on a particular frame. In order to create any camera movements, you must set at least two camera keyframes.
With Camera keyframes, you set the camera to go from one position in the frame to another, over a defined number of frames. You can also to control the velocity at which the camera attains its final position.
Keyframes appear as grey diamonds or half diamonds in the Timeline view. The space between keyframes in the Timeline view represents the number of frames it takes for the camera to move from one keyframe to the next, which determines the speed.
When a keyframe is selected in the Timeline view, it is displayed in blue. Camera keyframes are displayed in the Timeline view only, in a strip above the panel thumbnails. The first and last keyframes in a scene appear as half diamonds, while any in between are displayed as full diamonds.

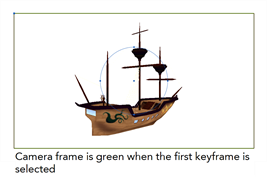
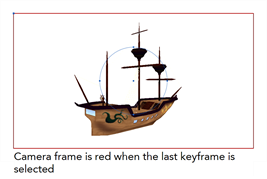
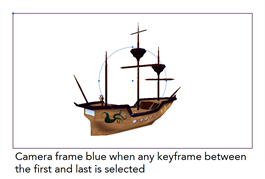
In the Timeline view, when the first keyframe of the panel is selected, the rectangle that defines the camera frame, along with a large X that quarters the camera frame, is highlighted in green. When the last keyframe is selected, these elements appear in red. If you have any keyframe between the first and last selected, then these elements will appear in blue.


These are the default camera keyframe colours. You can use the Preferences dialog box to choose your own camera keyframe colours. When you do, the new colours will used in the Camera and Stage views, as well as in the different export formats of your storyboard.
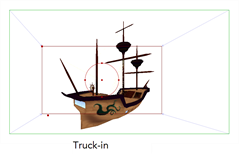
If you want to create a truck in or truck out (a move along the Z-axis), you can use the manipulators in the Top or Side views, (you can also click on the upper-left corner of the frame in the Camera view). If you select the arrow pointing along the Z-axis and drag the manipulators from that arrow instead of from the centre point of the manipulator circle, your movements will be locked to that axis. This is useful if you do not want to accidentally displace the up and down or left and right position of your camera frame.
Remember that the light-blue arrows in the Camera view do not necessarily indicate backward and forward movements. If your second camera frame appears larger or smaller than the initial camera frame position, then you can be sure that a camera truck in or truck out was made.

Time Estimated 15 mins
Difficulty Level Beginner
Topics List
- About the Panel Duration
- Changing the Panel Duration
- About the Camera
- About Camera Moves
- Animating Keyframes
- Copying and Pasting the Camera
- Spreading Camera Motions Across Panels
- Animating Layers
- Adjusting the Pivot Point of Layers
- About Sound
- Importing Sound Clips
- Adjusting the Sound Length and Timing
- Locking Audio Tracks
- Activity 1: Creating the Animatic
- Activity 2: Animating Layers
- Activity 3: Adding Sound
- About Markers
- Creating Markers on a Current Frame
- Editing Markers
- Displaying Marker Tooltips
- Moving Markers
- Deleting Markers
- Activity 4: Adding Scene Markers
- Flipping Scenes
- Activity 5: Flipping a Scene