- Modules
- Drawing and Colour
- About Drawing Tools
About Drawing Tools
T-SBFND-008-001
Vector Drawing
Bitmap Drawing
Drawing Tools
The two main drawing tools in Storyboard Pro are the Brush tool and the Pencil
tool. Depending on the drawing style you want to accommodate, you may prefer to work with Vector
or Bitmap
layers.
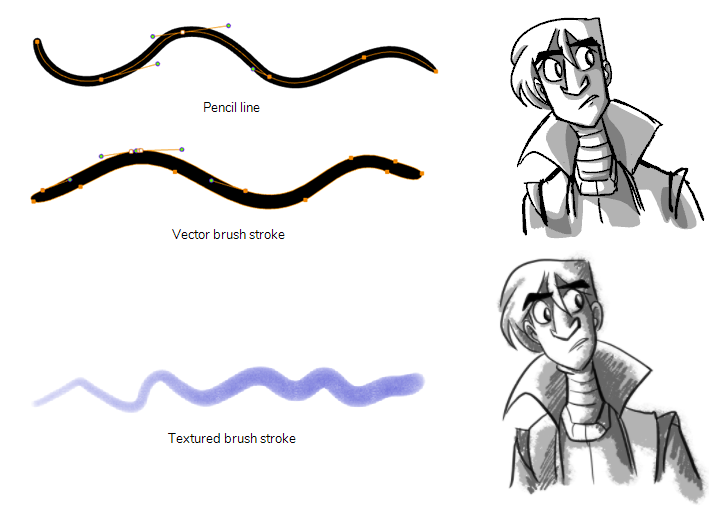
On vector layers, it is possible to draw with pencil lines, vector brushes and textured bitmap brushes. While pencil lines are merely vector centrelines to which Storyboard Pro adds the thickness, brush strokes are solid vector shapes filled with a colour, and textured brush strokes are regular brush strokes filled with a bitmap texture that filter out their colour.

On bitmap layers, you can only draw using solid or textured bitmap brushes. Hence, while vector layers are more flexible because they allow you to easily manipulate and tweak parts of your artwork, they can also accommodate more art styles.
However, if you use a textured brush on a vector layer, your brush strokes will have a bitmap texture. This means that, just like with artwork in bitmap layers, attempting to tweak or resize a textured brush stroke will require Storyboard Pro to resample the texture, which is liable to make it lose picture quality, unless its texture resolution was sufficiently increased before you started drawing.
One pitfall of using textured brushes on vector drawings is that, while bitmap drawings are always made of a single flat canvas, vector brush strokes are kept as separate objects. This means that laying on a lot of textured brush strokes on a vector drawing will require Storyboard Pro to store the texture for each of these strokes, and to composite them together in real time to display your drawing. This can cause texture-heavy vector drawings to be heavier on application performance and in file size than bitmap drawings. This is however the only case where a vector drawing is likely to be heavier than a bitmap drawing.
The following table compares the different approaches to drawing available in Storyboard Pro:
| Drawing Tool | Layer Type | Specifics |
|---|---|---|
| Pencil | Vector |
Advantages: Very light and easy to tweak. Can be manipulated, recoloured and tweaked by the centreline. Can be zoomed in on or scaled up without losing quality. Disadvantages: Does not support textures. Not optimized for transparency. Recommended Use: Sketches, clean drawings with a solid and uniform outline style. |
| Solid Vector Brush | Vector |
Advantages: Light file size. Reproduces traditional animation style. Can be manipulated, recoloured and edited by the contour or centreline. Can be zoomed in on or scaled up without losing quality. Disadvantages: Cannot reproduce the look of natural media. Recommended Use: Sketches, clean traditional animation-style drawings. |
| Textured Vector Brush | Vector |
Advantages: Can reproduce the look of natural media. As capable as textured bitmap brushes, but can be manipulated, edited and recoloured like solid vector brushes. Disadvantages: Overlapping strokes can make the drawing heavy on application performance and file sizes. Strokes of different colours cannot be flattened together. Tweaking, scaling up or zooming in on artwork is liable to make it lose texture quality. Recommended Use: For light bitmap-style textured artwork or mixed-style artwork. |
| Textured Bitmap Brush | Bitmap |
Advantages: Can reproduce the look of natural media. Better performance and lighter file size than texture-heavy vector artwork. Can be edited pixel by pixel. Disadvantages: Strokes are always flattened together and cannot be modified individually. Can only be drawn or erased upon. Scaling up or zooming in on artwork is liable to make it lose picture quality. Recommended Use: Texture-heavy bitmap artwork. |
Here are the drawing tools available in Storyboard Pro
| Icon | Tool Name | Vector Layer | Bitmap Laye |
|---|---|---|---|
|
|
Select |
✓ | ✓ |
|
|
Select by Colour |
✓ |
|
|
|
Cutter |
✓ | ✓ |
|
|
Contour Editor |
✓ |
|
|
|
Centerline Editor |
✓ | |
|
|
Perspective |
✓ |
|
|
|
Edit Gradient/Texture |
✓ |
|
|
|
Brush |
✓ | ✓ |
|
|
Pencil |
✓ |
|
|
|
Stamp | ✓ | |
|
|
Eraser |
✓ |
✓ |
|
|
Text |
✓ |
✓ |
|
|
Line |
✓ |
✓ |
|
|
Rectangle |
✓ |
✓ |
|
|
Ellipse |
✓ | ✓ |
|
|
Polyline |
✓ | |
|
|
Paint |
✓ | ✓ |
|
|
Paint Unpainted |
✓ | ✓ |
|
|
Unpaint |
✓ | ✓ |
|
|
Close Gap |
✓ |
|
|
|
Dropper | ✓ | ✓ |
Each drawing tool has a series of options to customize its behaviour and drawing style. When you select a tool, the Tool Properties view displays the properties of the currently selected tool, where you can configure your drawing tool's behavior and style, if applicable.
Time Estimated 20 mins
Difficulty Level Beginner
Topics List
- About Drawing Tools
- Drawing with the Brush Tool
- About the Centerline Editor
- Drawing with the Pencil Tool
- Drawing with Bitmap Brushes
- Erasing with Hard and Soft Erasers
- Using the Light Table
- Reshaping with the Contour Editor Tool
- Cutting
- Drawing with the Polyline Tool
- About Colour Swatches
- Changing the Current Colour
- Adding Colour Swatches
- Painting
- Importing Images
- About the Onion Skin
- Setting the Onion Skin
- Flipping through Onion-skinned Drawings
- Activity 1: Using Onion Skin on Layers with the Same Name
- Editing Artwork on Multiple Panels
- Copying Artwork on Multiple Panels
- Activity 2: Drawing Scenes
- Generating Auto-Matte Layers
- Activity 3: Generating an Auto-Matte